Dolphin的博客

Spring step by step(二)--持久化

环境:

  • Windows 7 X64 Ultimate

  • JDK 1.8

  • Spring-Framework 4.2.3.RELEASE

  • MyBatis 3.3.1

  • Eclipse Java EE IDE for Web Developers.Version: Neon Release (4.6.0)Build id:20160613-1800

  • Maven 3.3.9

  • MySQL 5.7

MyBatis简介

MyBatis是一个可以自定义SQL、存储过程和高级映射的持久层框架。MyBatis摒除了大部分的JDBC代码、手工设置参数和结果集重获。MyBatis只使用简单的XML和注解来配置和映射基本数据类型、Map 接口和POJO(Plain Ordinary Java Object)到数据库记录。相对Hibernate和Apache OJB等“一站式”ORM(Object Relational Mapping)解决方案而言,Mybatis是一种“半自动化”的ORM实现。

引入MyBatis依赖包

在Maven项目的POM.xml中定义MyBatis和Spring相关包的版本。

1
2
3
4
5
6
<properties>
<mybatis.version>3.3.1</mybatis.version>
<mybatis.spring.version>1.2.4</mybatis.spring.version>
<spring.version>4.2.3.RELEASE</spring.version>
<druid-version>1.0.26</druid-version>
</properties>

引入Spring依赖包

在Maven项目的POM.xml中引入Spring相关的依赖包。

1
2
3
4
5
6
7
8
9
10
11
12
13
14
15
16
17
18
19
20
21
<!-- Spring -->
<dependency>
<groupId>org.springframework</groupId>
<artifactId>spring-context</artifactId>
<version>${spring.version}</version>
</dependency>
<dependency>
<groupId>org.springframework</groupId>
<artifactId>spring-test</artifactId>
<version>${spring.version}</version>
</dependency>
<dependency>
<groupId>org.springframework</groupId>
<artifactId>spring-web</artifactId>
<version>${spring.version}</version>
</dependency>
<dependency>
<groupId>org.springframework</groupId>
<artifactId>spring-jdbc</artifactId>
<version>${spring.version}</version>
</dependency>

引入MySQL链接包

1
2
3
4
5
6
7
8
9
10
11
<!-- mysql -->
<dependency>
<groupId>mysql</groupId>
<artifactId>mysql-connector-java</artifactId>
<version>5.1.30</version>
</dependency>
<dependency>
<groupId>com.alibaba</groupId>
<artifactId>druid</artifactId>
<version>${druid-version}</version>
</dependency>

Java常用的数据库连接池有DBCP、C3P0、Proxool、JBoss,此处数据库连接采用Alibaba的Druid框架,Druid是Java语言中较好的数据库连接池。Druid能够提供强大的监控和扩展功能。更加详细信息科参考阿里巴巴开源项目Druid负责人温少访谈

引入AOP包

1
2
3
4
5
6
7
8
9
10
<dependency>
<groupId>org.aspectj</groupId>
<artifactId>aspectjrt</artifactId>
<version>1.7.2</version>
</dependency>
<dependency>
<groupId>org.aspectj</groupId>
<artifactId>aspectjweaver</artifactId>
<version>1.7.2</version>
</dependency>

Spring基础配置

1
2
3
4
5
6
7
8
9
10
11
12
13
14
15
16
17
18
19
20
21
22
23
24
25
26
27
28
<beans xmlns="http://www.springframework.org/schema/beans"
xmlns:xsi="http://www.w3.org/2001/XMLSchema-instance" xmlns:aop="http://www.springframework.org/schema/aop"
xmlns:context="http://www.springframework.org/schema/context"
xmlns:util="http://www.springframework.org/schema/util"
xsi:schemaLocation="http://www.springframework.org/schema/beans
http://www.springframework.org/schema/beans/spring-beans.xsd
http://www.springframework.org/schema/aop
http://www.springframework.org/schema/aop/spring-aop.xsd
http://www.springframework.org/schema/util
http://www.springframework.org/schema/util/spring-util.xsd
http://www.springframework.org/schema/context
http://www.springframework.org/schema/context/spring-context.xsd">

<description>spring主配置文件</description>
<util:properties id="applicationProperties" location="classpath:application.properties" />
<context:property-placeholder properties-ref="applicationProperties"
ignore-resource-not-found="true" />
<context:component-scan base-package="dolphin.service.*">
</context:component-scan>

<!--aop 注解风格支持 proxy-targer-class默认false,用jdk动态代理,true是cglib .expose-proxy当前代理是否为可暴露状态,值是"ture",则为可访问。 -->
<aop:aspectj-autoproxy expose-proxy="true"
proxy-target-class="true" />
<aop:config expose-proxy="true" proxy-target-class="true" />

<import resource="classpath:spring-config/spring-mybatis.xml" />
<import resource="classpath:spring-config/spring-datasource.xml" />
</beans>

Spring 自 2.0 版本开始,陆续引入了一些注解用于简化 Spring 的开发。@Repository 注解便属于最先引入的一批,它用于将数据访问层 (DAO 层 ) 的类标识为 Spring Bean。具体只需将该注解标注在 DAO 类上即可。同时,为了让 Spring 能够扫描类路径中的类并识别出 @Repository 注解,需要在 XML 配置文件中启用 Bean 的自动扫描功能,这可以通过context:component-scan实现。context:component-scan定义了相关Bean的扫描路径。就不再需要在 XML 中显式使用 进行 Bean 的配置。Spring 在容器初始化时将自动扫描 base-package 指定的包及其子包下的所有 class 文件,所有标注了 @Repository 的类都将被注册为 Spring Bean。

新建Spring-Mybatis配置文件

1
2
3
4
5
6
7
8
9
10
11
12
13
14
15
16
17
18
19
20
<beans xmlns="http://www.springframework.org/schema/beans"
xmlns:xsi="http://www.w3.org/2001/XMLSchema-instance" xmlns:tx="http://www.springframework.org/schema/tx"
xsi:schemaLocation="http://www.springframework.org/schema/beans
http://www.springframework.org/schema/beans/spring-beans.xsd
http://www.springframework.org/schema/tx
http://www.springframework.org/schema/tx/spring-tx.xsd">
<description>Spring 整合 MyBatis</description>
<!-- 在基本的MyBatis中,session 工厂可以使用SqlSessionFactoryBuilder.来创建。在MyBatis-Spring中,使用了SqlSessionFactoryBean来替代。 -->
<bean id="sqlSessionFactory" class="org.mybatis.spring.SqlSessionFactoryBean">
<property name="dataSource" ref="dataSource" />
<!-- 指定sqlMapConfig总配置文件,订制的environment在spring容器中不在生效 -->
<property name="configLocation" value="classpath:mybatis-config.xml" />
</bean>

<!-- Mybatis 映射文件路径 用逗号隔开 -->
<bean class="org.mybatis.spring.mapper.MapperScannerConfigurer">
<property name="basePackage" value="dolphin.dao" />
<property name="sqlSessionFactoryBeanName" value="sqlSessionFactory" />
</bean>
</beans>

新建MyBatis配置文件

1
2
3
4
5
6
7
8
9
10
11
12
13
14
15
16
17
18
19
20
21
22
23
24
25
26
27
<?xml version="1.0" encoding="UTF-8"?>
<!DOCTYPE configuration PUBLIC "-//mybatis.org//DTD Config 3.1//EN"
"http://mybatis.org/dtd/mybatis-3-config.dtd">
<configuration>
<!--设置-->
<settings>
<!-- 全局映射器启用缓存,不建议使用mybatis自己的缓存-->
<setting name="cacheEnabled" value="false" />
<!-- 查询时,关闭关联对象即时加载以提高性能 -->
<setting name="lazyLoadingEnabled" value="true" />
<!-- 设置关联对象加载的形态,此处为按需加载字段(加载字段由SQL指定),不会加载关联表的所有字段,以提高性能 -->
<setting name="aggressiveLazyLoading" value="false" />
<!-- 对于未知的SQL查询,允许返回不同的结果集以达到通用的效果 -->
<setting name="multipleResultSetsEnabled" value="true" />
<!-- 允许使用列标签代替列名 -->
<setting name="useColumnLabel" value="true" />
<!-- 允许使用自定义的主键值(比如由程序生成的UUID 32位编码作为键值),数据表的PK生成策略将被覆盖 -->
<setting name="useGeneratedKeys" value="true" />
<!-- 给予被嵌套的resultMap以字段-属性的映射支持 -->
<setting name="autoMappingBehavior" value="FULL" />
<!-- 对于批量更新操作缓存SQL以提高性能 但是返回id有问题-->
<setting name="defaultExecutorType" value="SIMPLE" />
<!-- 数据库超过36000秒仍未响应则超时 -->
<setting name="defaultStatementTimeout" value="36000" />
<setting name="mapUnderscoreToCamelCase" value="true"/>
</settings>
</configuration>

数据库链接配置

1
2
3
4
5
6
7
#=========================================
# DataSource
#=========================================
jdbc.driverClass = com.mysql.jdbc.Driver
jdbc.url = jdbc:mysql://127.0.0.1:3306/test
jdbc.username = root
jdbc.password =123456

新建POJO

1
2
3
4
5
6
7
8
9
10
11
12
13
14
15
16
17
18
19
20
21
22
public class Country {

private Integer id;

public Integer getId() {
return id;
}

public void setId(Integer id) {
this.id = id;
}

private String countryName;

public String getCountryName() {
return countryName;
}

public void setCountryName(String countryName) {
this.countryName = countryName;
}
}

新建DAO

1
2
3
public interface CountryDao {
Country getCountry(int id);
}

新建Mapper

1
2
3
4
5
6
7
8
9
10
11
12
<?xml version="1.0" encoding="UTF-8"?>
<!DOCTYPE mapper PUBLIC "-//mybatis.org//DTD Mapper 3.3//EN"
"http://mybatis.org/dtd/mybatis-3-mapper.dtd">
<mapper namespace="dolphin.dao.CountryDao">
<select id="getCountry" parameterType="int" resultType="dolphin.mode.Country">
SELECT
*
FROM
country
WHERE id = #{id}
</select>
</mapper>

新建Service

1
2
3
public interface CountryService {
Country getCountyById(int id);
}

实现接口

1
2
3
4
5
6
7
8
9
@Service
public class CountryServiceImpl implements CountryService{

@Autowired
private CountryDao countryDao;
public Country getCountyById(int id) {
return countryDao.getCountry(id);
}
}

新建测试类

1
2
3
4
@RunWith(SpringJUnit4ClassRunner.class)
@ContextConfiguration("classpath:spring-config/spring-base.xml")
public class BasicTest {
}
1
2
3
4
5
6
7
8
9
10
11
12
13
14
15
16
public class PageMapperTest extends BasicTest {

@Autowired
private CountryService countryService;

@Test
public void test() {
try {
Country country = countryService.getCountyById(1);
System.out.print(country.getId());
} catch (Exception e) {
// TODO Auto-generated catch block
e.printStackTrace();
}
}
}

新建数据库表

1
2
3
4
5
6
7
8
9
10
11
12
13
14
15
16
USE `test`;

#
# Table structure for table country
#

DROP TABLE IF EXISTS `country`;
CREATE TABLE `country` (
`Id` int(11) NOT NULL AUTO_INCREMENT COMMENT '主键',
`countryname` varchar(255) DEFAULT NULL COMMENT '名称',
`countrycode` varchar(255) DEFAULT NULL COMMENT '代码',
PRIMARY KEY (`Id`)
) ENGINE=InnoDB DEFAULT CHARSET=utf8 COMMENT='国家信息';

INSERT INTO `country` VALUES (1,'Angola','AO');
INSERT INTO `country` VALUES (2,'Afghanistan','AF');

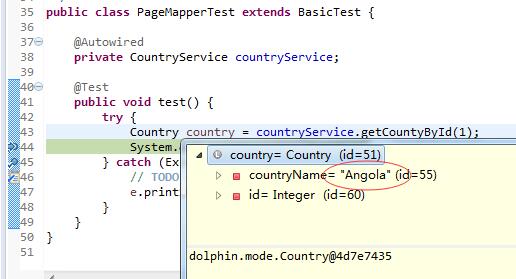
启动测试

结果如下如所示。

引用文章:

详解 Spring 3.0 基于 Annotation 的依赖注入实现