Dolphin的博客

Spring step by step(一)--依赖注入(Dependency Injection)

为什么要依赖注入

依赖注入(Dependency Injection)所要达到的目标是实现程序间的松耦合。将服务的调用者和服务的提供者分离。DI提供一种机制,在运行时绑定服务的提供者和调用者。

新建项目

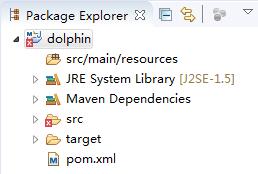
新建一个Web项目,目录结构如下。
引入包

引入servlet-api.jar包,目录结构如下。
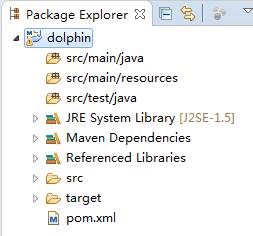
注意引入servlet-api.jar包后,多了src/main/java目录和src/test/java目录。servlet-api.jar包中,实现了Sevlet规范,在Apache Tomcat 8.0.37中实现的是Servlet Specification 3.1,JSP Specification 2.3。版本之间详细的对应关系可以看Apache Tomcat Versions

添加Spring依赖包

在Maven的POM文件中添加spring-context依赖。

1
2
3
4
5
<dependency>
<groupId>org.springframework</groupId>
<artifactId>spring-context</artifactId>
<version>4.3.3.RELEASE</version>
</dependency>

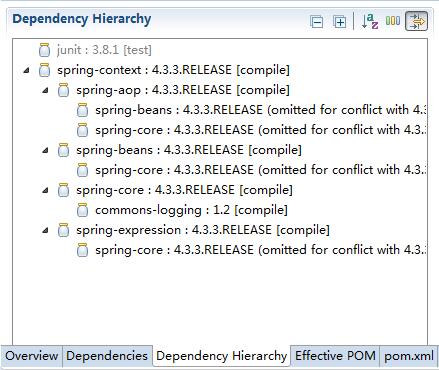
此处虽然只添加了一个jar包,Maven会自动下载此jar包相关的依赖包。在Maven的Dependency Hierarchy中查看包与包之间的依赖关系如下图所示。
添加类

1
2
3
public interface MessageService {
String getMessage();
}
1
2
3
4
5
6
7
8
9
10
11
12
13
14
@Component
public class MessagePrinter {

final private MessageService service;

@Autowired
public MessagePrinter(MessageService service) {
this.service = service;
}

public void printMessage() {
System.out.println(this.service.getMessage());
}
}

带有 @Configuration 的注解类表示这个类可以使用 Spring IoC 容器作为 bean 定义的来源。@Bean 注解告诉 Spring,一个带有 @Bean 的注解方法将返回一个对象,该对象应该被注册为在 Spring 应用程序上下文中的 bean。

1
2
3
4
5
6
7
8
9
10
11
12
13
14
15
16
17
18
@Configuration
@ComponentScan
public class Application {
@Bean
MessageService mockMessageService() {
return new MessageService() {
public String getMessage() {
return "Hello World!";
}
};
}

public static void main(String[] args) {
ApplicationContext context = new AnnotationConfigApplicationContext(Application.class);
MessagePrinter printer = context.getBean(MessagePrinter.class);
printer.printMessage();
}
}

上面的代码(排除Main函数)等同于:

1
2
3
<beans>
<bean id="mockMessageService" class="dolphin.MessageService" />
</beans>

带有 @Bean 注解的方法名称作为 bean 的 ID,它创建并返回实际的 bean。配置类可以声明多个 @Bean。一旦定义了配置类,你就可以使用 AnnotationConfigApplicationContext 来加载并把他们提供给 Spring 容器(Main方法中即是)。

运行

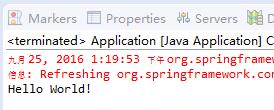
结果如图所示。
来自: